
SparseAGS (Sparse-view Pose Estimation and Reconstruction via Analysis by Generative Synthesis ) は数枚の画像から3Dデータを構築する技術です。多くの3Dスキャンなどではキャリブレーションという形で、カメラがどの位置にあり・どの角度で撮影したかという情報が重要になっていたのですが、この技術はそれを画像から推論することで補っています。キャリブレーションいらずで、撮影済みの画像から3Dデータを構築することができます。
githubリポジトリがあったのでGoogle Colabで試してみました。
最初はgithubにある通りgradio web-uiを使ったのですが、エラーが出ていたのでコマンドライン形式で進めます。
!git clone --recursive https://github.com/QitaoZhao/SparseAGS.git

!pip install torch==2.1.0 torchvision==0.16.0 torchaudio==2.1.0 --index-url https://download.pytorch.org/whl/cu121

%cd /content/SparseAGS

!pip install -r requirements.txt
途中でGoogle Colabリスタートが発生します。
%cd /content/SparseAGS
!pip install -r requirements.txt
検索すると、pythorch3dはこのようにstableを入れるというgithub issueを見かけました
!pip install -v -v -v 'git+https://github.com/facebookresearch/pytorch3d.git@stable'ninja-buildを入れます。
!apt-get install -y ninja-build以下は公式にもある通り。
# liegroups (minor modification to https://github.com/utiasSTARS/liegroups)
!pip install ./liegroups

# simple-knn
!pip install ./simple-knn

# a modified gaussian splatting that enables camera pose optimization
!pip install ./diff-gaussian-rasterization-camera
!mkdir /content/SparseAGS/checkpoints
%cd /content/SparseAGS/checkpoints/
!pip install gdown
!gdown "https://drive.google.com/uc?id=1JJ4wjaJ4IkUERRZYRrlNoQ-tXvftEYJD"
%cd ..実行する
前処理のprocess.pyですが、特定のフォルダを以下のように指定できます。
# process all jpg images under a dir
!python process.py /content/SparseAGS/data/test
出力先としては /content/SparseAGS/data/demo/custom というところに処理済みの画像が出力されます。
[F glutil.cpp:338] eglInitialize() failed
run.pyを走らせたところ、このようなエラーが出ました。
Google Colabがヘッドレス環境のため、 EGL を使った OpenGL を起動に失敗しているのだと思われます。
どこで使っているのか確認します。
import os

def find_egl_references(search_path):

    egl_keywords = ["RasterizeGLContext"]
    matches = []

    for root, dirs, files in os.walk(search_path):
        for file in files:
            if file.endswith(".cpp") or file.endswith(".py"):
                file_path = os.path.join(root, file)
                try:
                    with open(file_path, "r") as f:
                        lines = f.readlines()
                        for i, line in enumerate(lines):
                            if any(keyword in line for keyword in egl_keywords):
                                matches.append((file_path, i + 1, line.strip()))
                except Exception as e:
                    print(f"[ERROR] Cannot read file: {file_path}. Reason: {e}")

    # 結果
    if matches:
        print(f"Found {len(matches)} match(es):")
        for match in matches:
            print(f"File: {match[0]} | Line: {match[1]} | Code: {match[2]}")
    else:
        print("No matches found for EGL keywords.")

search_directory = "/content/SparseAGS/sparseags"

# Run
find_egl_references(search_directory)
見つかったファイルのコードを書き換えます。
# この if 文を書き換えて、↓↓のように強制的に else 側のみの処理にする
if not self.opt.force_cuda_rast and (not self.opt.gui or os.name == 'nt'):
    glctx = dr.RasterizeGLContext()
else:
    glctx = dr.RasterizeCudaContext()


# 常に CUDA バックエンド
glctx = dr.RasterizeCudaContext()
再実行
例えば、自分の用意したデータでやるのであれば、以下のように書けます。
!python run.py --category custom --num_views 8 --enable_loopcategoryオプションにcustomと入れると、process.pyで処理したファイルを読み込みます。
コマンドラインで実行できたので、gradio web ui でも実行してみます。
サンプルにあるバスケットシューズ jordan を実行しました。
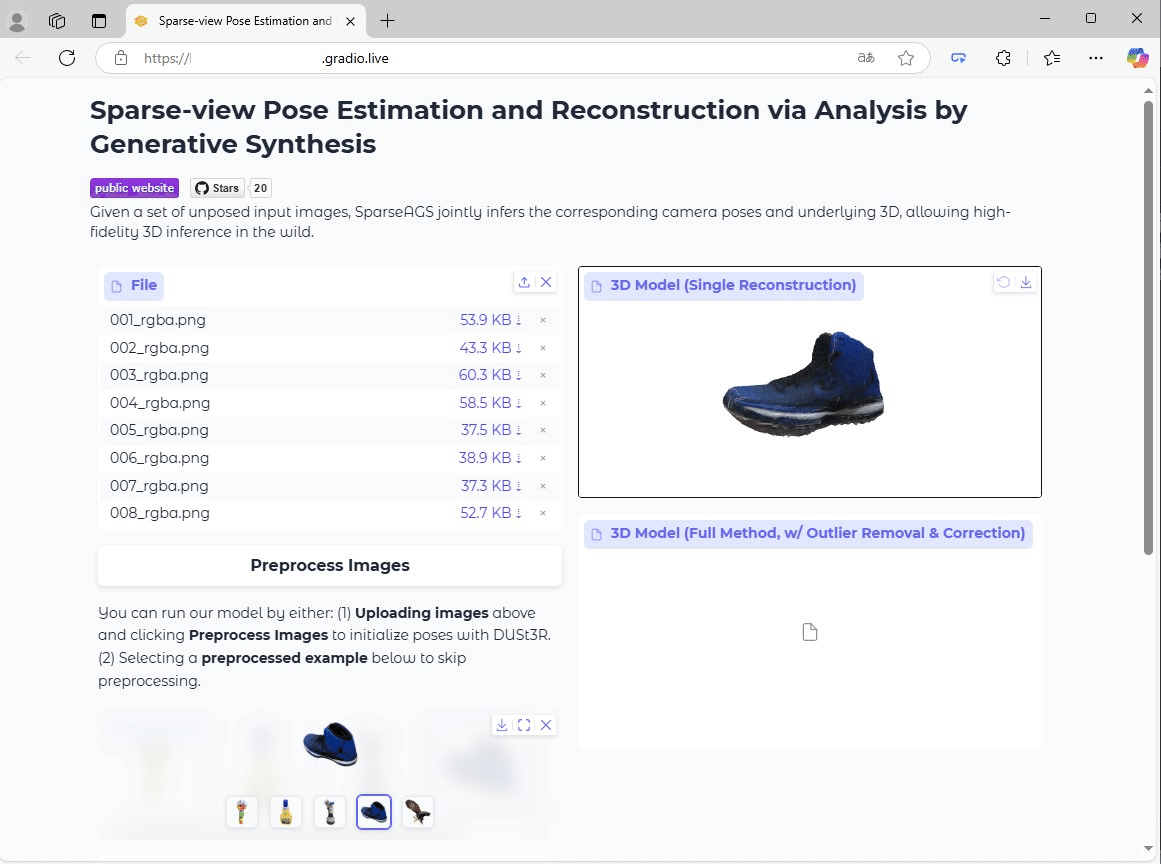
少ない枚数で3Dモデルを構築できるのは魅力的です。
一方で、撮影段階に関与できるのであれば、
弊社の3Dスキャンなどの技術を用いて3Dデータ化してしまうことをオススメします。


